How to Use Community Badges on your Answerbase Community Platform
Answerbase provides many incentives for users to contribute valuable content while they're engaging with your community platform. You can incentive users through reputation points, user profiles, featuring users, rewards and badges. This article will focus on user badges, how to set them up and how to effectively use them to incentive your community.
Enabling Badges for Your Community
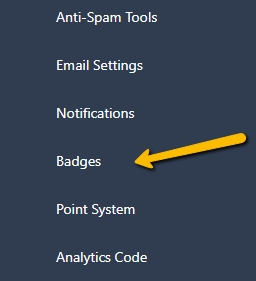
You can create badges for your community and manage those badges within your Answerbase Administration Interface under "System Settings > Badges" as seen here:

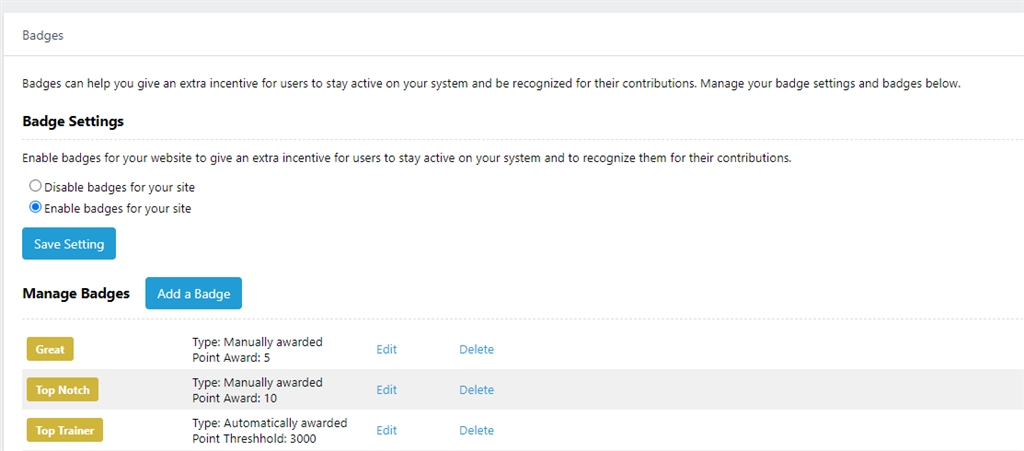
When you go into the "Badges" area you'll see the option to enable badges for your site. If you'd like to enable badges, select that setting and save those settings:

Once you save those settings your users can and will be rewarded badges, depending on the type of badges you create for your site.
Creating New Badges
To create a new badge, simply select "Add a Badge" and you'll be taken to a page where you can create a new badge. You'll be asked to fill out some information in order to create the badge....we'll walk you through what each of these fields means and does here:
Once you've identified the settings that you'd like to apply to your badges, you can save that badge and it will be added to your list of badges as seen here:

You can add as many badges as you'd like or manage them within that list.
Awarding Badges to Your Community Members
Once you've created badges, they can be awarded to your community members.
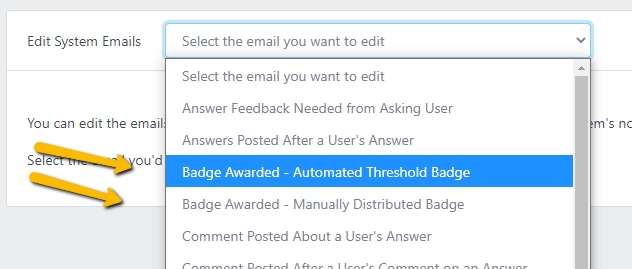
When a user has been awarded a badge, they will receive a notification letting them know the title of the badge they've received as well as it's description. You can view and edit the email notification that the user receives upon receiving a badge under "Customization > System Emails" in your Answerbase Administration Portal as seen here:

How Badges Display on Users Profiles
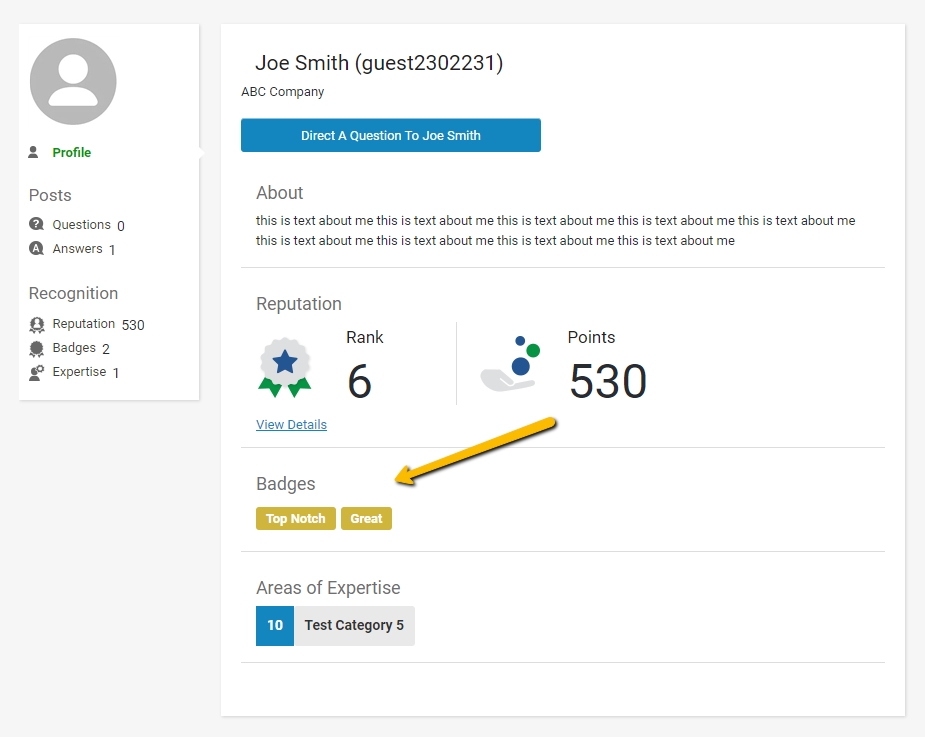
After badges are rewarded to users, you'll see them start displaying on the user's profiles so that other users can recognize what badges each community member has earned and they can be publicly recognized for their contributions. See this example here:

This gives users a way to be publicly recognized for their accomplishments, which gives them further incentive to contribute valuable content for your site.
We hope this has bee an informative post for you and if you have any questions about badges and how they can help create an incentive for your community, please Contact Us and we'll make sure you're taken care of.
Enabling Badges for Your Community
You can create badges for your community and manage those badges within your Answerbase Administration Interface under "System Settings > Badges" as seen here:

When you go into the "Badges" area you'll see the option to enable badges for your site. If you'd like to enable badges, select that setting and save those settings:

Once you save those settings your users can and will be rewarded badges, depending on the type of badges you create for your site.
Creating New Badges
To create a new badge, simply select "Add a Badge" and you'll be taken to a page where you can create a new badge. You'll be asked to fill out some information in order to create the badge....we'll walk you through what each of these fields means and does here:
- Badge Title & Description
- Badge Title: This will be the title of your badge. If you're not going to be using an icon to represent your badges, this title will actually display within the badge itself.
- Badge Description: This is the description of your badge, giving a summary of why users achieve this badge and how they should be looked at in the community. This will be sent to the user once they've received the badge and can also be listed on your help page when describing what badges the community can receive and what it means.
- Badge Look: This is where you identify how the badge will be displayed on user profiles.
- Use the standard badge look: This is an option where we just use the title of the badge (as noted above) to display on the user's profile. You can choose a simple color scheme where you'd choose what the background color of the badge will be as well as what color the text will be of the title. It will look similar to this:

You just need to select your desired colors if you'd like to use our standard badge look/feel. - Upload a badge icon: This is an option in case you'd like to show an icon as a badge on the user profiles, which in this case you can upload any image that you want which will represent the badge you give. As an example, see this badge example:

You can really reflect whatever you'd like here, but this gives you an option to have an engaging icon as your badges which displays well on your user profiles.
- Use the standard badge look: This is an option where we just use the title of the badge (as noted above) to display on the user's profile. You can choose a simple color scheme where you'd choose what the background color of the badge will be as well as what color the text will be of the title. It will look similar to this:
- Badge Types: This let's you choose what type of badge you're creating and whether those badges should be rewarded manually by your moderators and administrators or whether the platform will reward those badges automatically when a user reaches a certain reputation point threshold.
- Automatic: These badges are automatically awarded when a user achieves a certain amount of total points. When the user achieves the total that you identify in this setting, they will receive this badge and be sent an email letting them know the title of the badge and the description of the badge they've received. Some examples of badges that may make sense to have as automatic may be something like "Beginner", "Expert", "Genius"...or things like that which reflect different levels of expertise based on the reputation points they've received.
- Manual: These badges are manually awarded by the administrator or moderators, many times recognizing the user for a certification that they have and has been verified and you can reward the user with points if they are given this badge. Examples of these badges may be something like "Certified Trainer".
Once you've identified the settings that you'd like to apply to your badges, you can save that badge and it will be added to your list of badges as seen here:

You can add as many badges as you'd like or manage them within that list.
Awarding Badges to Your Community Members
Once you've created badges, they can be awarded to your community members.
- Automatic Badges: For "Automatic" badges....they will automatically be awarded when a user reaches the defined number of reputation points. You can manage how many points users get for different actions on the platform in your Answerbase Administration Area under "System Settings > Point System".
- Manual Badges: You can manually reward badges within your Answerbase Administration Portal under "Users > User List" by finding the user you'd like to reward the badge to and going under "Members > Badges" where you can reward the badge manually to that user there.
When a user has been awarded a badge, they will receive a notification letting them know the title of the badge they've received as well as it's description. You can view and edit the email notification that the user receives upon receiving a badge under "Customization > System Emails" in your Answerbase Administration Portal as seen here:

How Badges Display on Users Profiles
After badges are rewarded to users, you'll see them start displaying on the user's profiles so that other users can recognize what badges each community member has earned and they can be publicly recognized for their contributions. See this example here:

This gives users a way to be publicly recognized for their accomplishments, which gives them further incentive to contribute valuable content for your site.
We hope this has bee an informative post for you and if you have any questions about badges and how they can help create an incentive for your community, please Contact Us and we'll make sure you're taken care of.

